Table of contents
Open Table of contents
Introduction
Recap: In part 1, I discussed my experience sourcing and assembling the hardware. Part 2, we went through how to set up Proxmox as virtualisation layer.
So, where are we at? We have our server up and running and we have installed Proxmox so that we can virtualise the hardware and run multiple VMs on top of it.
Now, next step is to launch Kubernetes nodes so that we get started with our cluster.
But wait… This is not going to scale. You’d have to install everything on the VM each time you want to launch a VM. This is really time consuming for initial set up as well as if we launch additional nodes or replace existing nodes.
Proxmox VM Templates and Cloning
How do we usually install an OS? Boot from installation media, click “Next, Next, Next… Finished,” wait through a couple of restarts, and you’re done. Congrats — your OS is installed!
But in a cloud environment, things work differently. You don’t go through the “Next, Next… Finished” set up, and you don’t boot from installation media either. Instead, you simply specify an Image. No installation steps, no waiting around — you instantly get a fully working OS. What’s going on here? Let’s explore.
In the first case, you boot into installation media. This media is software in itself, designed to copy the OS to disk and set up the system to load it during boot. In the second case, you’re handed a snapshot of a machine’s boot disk. By copying that snapshot directly to your own boot disk, you essentially skip the installation process altogether.
There’s obviously a problem with this approach. Our proposal is that if we copy the boot disk of a running VM to a different disk and make the VM boot from that disk, this should essentially work. But what about source machine specific information like hostname, IP address, keys etc.? By our proposal, those would also get copied over - and that’s a problem.
So, what’s the solution? Generalisation. Snapshots are generalised, meaning machine-specific info is stripped off and only minimal defaults apply like hostname as generic ubuntu or localhost.
Again, this will lead to a different issue: when you launch a VM based on the template, you get all the VMs with same default configuration. Enter cloud-init, which bootstrap the VM during the initial boot. It can configure things like networking, hostname, SSH keys etc. and can even run custom scripts on boot. Sounds familiar to user data in AWS? That’s exactly cloud-init behind the scenes.
How does this work with Proxmox, you may ask? Proxmox VM templates and cloning are built for this exact use case. You can convert a VM into a template — in other words, Proxmox will create a generalized snapshot of the VM. From there, you can clone new VMs from the template, and with cloud-init, each one will bootstrap into a unique system.
Proxmox Base Image for Kubernetes Nodes
Enough explaining about templates and clones. Let’s dive straight into the action. First thing we need to create a template is a running VM. We’ll use cloud image of Ubuntu 24.04 to skip the installation process. And then we’ll install required packages required for a Kubernetes nodes.
Creating a Proxmox VM
First, we’ll download the Ubuntu 24.04 cloud image from Ubuntu downloads page ↗. Since I’m running Intel processor, I downloaded amd64 ↗ image ↗. This will be the image we use to create the VM.
As mentioned in the previous post, we’ll be using qm ↗, QEMU VM Manager, to create and manage VMs. First let’s start by creating a VM:
qm create 1002 --name k8s-node-base --cores 2 --memory 4086 --net0 virtio,bridge=vmbr0This creates a VM with ID 1002 and other obvious parameters. This command creates a config file at /etc/pve/qemu-server/1002.conf.
Now let’s recap what all components we had for our PC build: a CPU, memory, bootable disk, display console, network interface. We need to define these hardware for our VM for it to function. CPU and memory has been provsioned in the create command itself. Also, we have configured the network interface as a bridge to vmbr0 (more on this on upcoming post 👀). Let’s create the bootable disk from Ubuntu 24.04 cloud image.
# Download the cloud image
wget https://cloud-images.ubuntu.com/noble/current/noble-server-cloudimg-amd64.img -O ubuntu-24.04-cloud.qcow2

# Import the disk to local-lvm store: this creates a LVM logical volume
qm importdisk 1002 ubuntu-24.04-cloud.qcow2 local-lvm

# Sets the SCSI controller to virtio-scsi-pci and attaches vm-1002-disk-0 from local-lvm to the VM at SCSI port 0
qm set 1002 --scsihw virtio-scsi-pci --scsi0 local-lvm:vm-1002-disk-0

# mark scsi0 as bootable
qm set 1002 --boot order=scsi0 --bootdisk scsi0
This command tells QEMU that the hardware controller to use is SCSI ↗ via virtualised using virtio-scsi-pci. Also attach the disk imported at SCSI port 0. Next, we’ll set up display console so that we can login to the server without SSH. We’ll also enable guest agent.
# attach vga console for display
qm set 1002 --serial0 socket --vga serial0

# Enable guest agent
qm set 1002 --agent enabled=1
Finally, let’s set up cloud-init configuration so that VM specific configurations are in-place. Hostname will be same as --name parameter in the create command. We will set networking options, user configuration including SSH keys.
# Proxmox provides a virtual drive for cloud-init that you can mount to our VM. We'll mount it at IDE port 2.
qm set 1002 --ide2 local-lvm:cloudinit

# Now specify options for cloud-init. Be cautious with the password!
qm set 1002 --ciuser ubuntu --cipassword 'ubuntu' --ipconfig0 ip=dhcp

# Optionally, set up SSH keys for headless login.
qm set 1002 --sshkey ~/.ssh/id_rsa.pub
And, let’s start the VM!
# Start the VM
qm start 1002
Here’s the VM in the Proxmox UI.
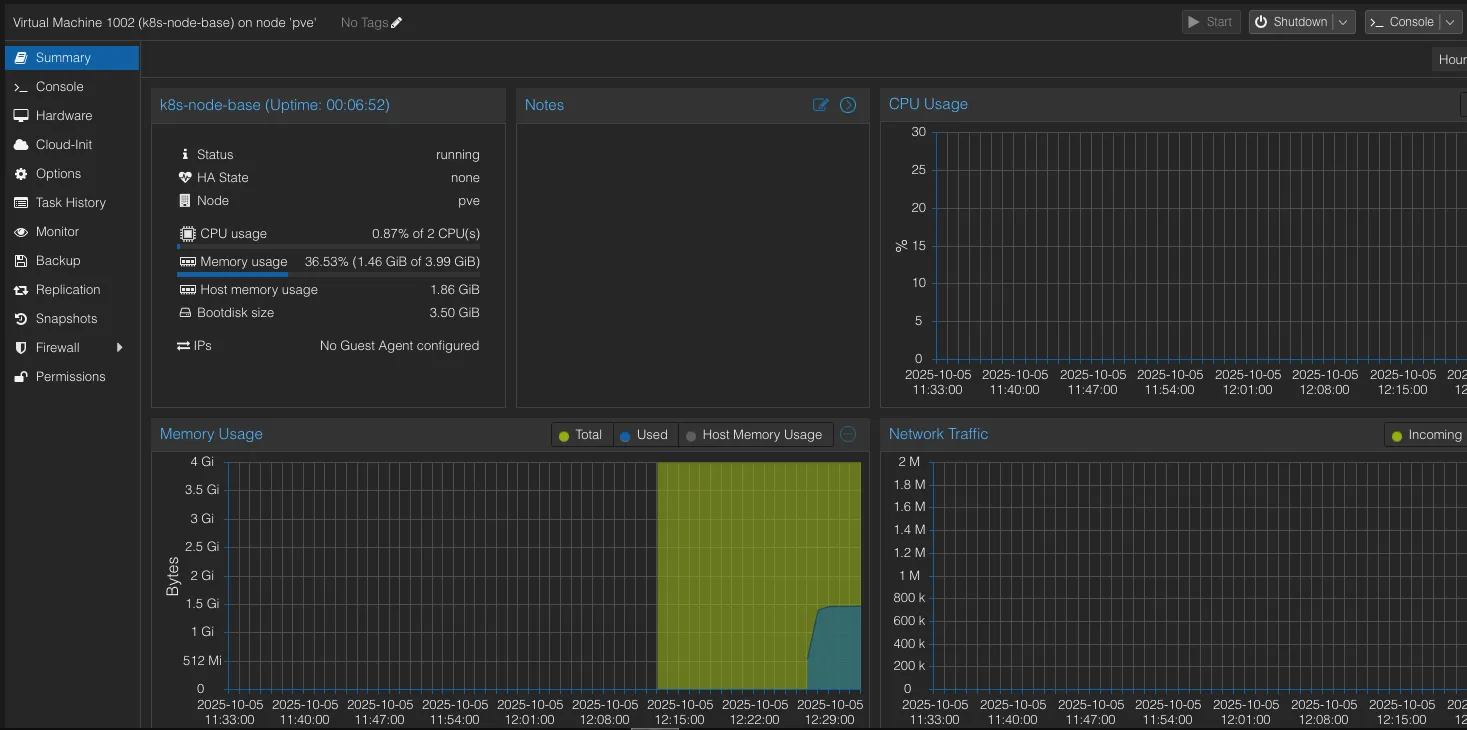
Notice there’s no IP address displayed in the UI? That’s because the VM needs guest agent which exposes information like IP address to the host. Now since don’t have the IP address, how do we login to the VM? Remember, we attached a VGA graphical console at serial port 0? That’s exactly for this use-case. Click on “Console” on the top right corner, it’ll give us a terminal attached to the serial console.
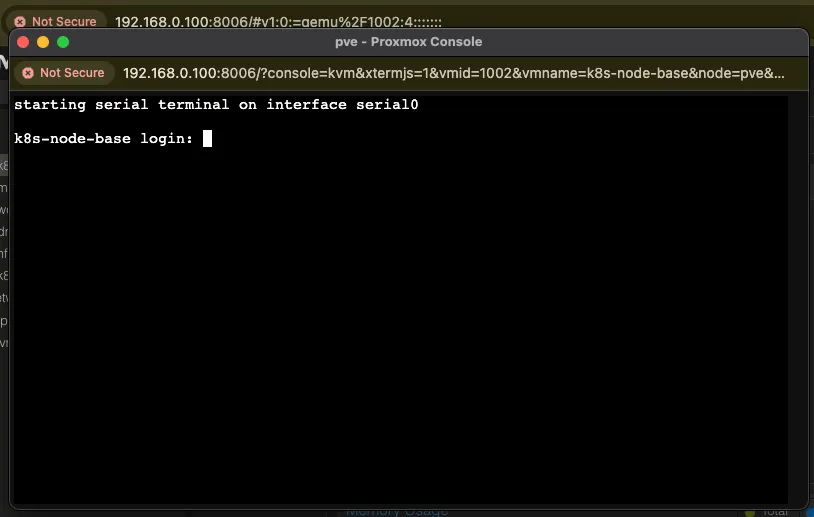
Enter username and password and check if the VM has an IP address. This is what I got.
ubuntu@k8s-node-base:~$ ip a
1: lo: <LOOPBACK,UP,LOWER_UP> mtu 65536 qdisc noqueue state UNKNOWN group default qlen 1000
    link/loopback 00:00:00:00:00:00 brd 00:00:00:00:00:00
    inet 127.0.0.1/8 scope host lo
       valid_lft forever preferred_lft forever
    inet6 ::1/128 scope host noprefixroute
       valid_lft forever preferred_lft forever
2: eth0: <BROADCAST,MULTICAST,UP,LOWER_UP> mtu 1500 qdisc fq_codel state UP group default qlen 1000
    link/ether bc:24:11:e2:a6:f5 brd ff:ff:ff:ff:ff:ff
    altname enp0s18
    inet 192.168.0.5/24 metric 100 brd 192.168.0.255 scope global dynamic eth0
       valid_lft 6215sec preferred_lft 6215sec
    inet6 fe80::be24:11ff:fee2:a6f5/64 scope link
       valid_lft forever preferred_lft forever
Take a look at eth0, the IP address is from my local router’s DHCP pool and I’ll be able to access from any device connected to the router. From my laptop, I’ll be able to SSH into the VM.
Installing Required Packages
We have the VM up and running and we are able to login to the VM. First thing we’ll install on the VM is the guest agent so that we can view the IP details right from the Proxmox UI itself.
# Install QEMU guest agent
sudo apt-get install qemu-guest-agent

# Enable the service and restart the VM
sudo systemctl enable qemu-guest-agent.service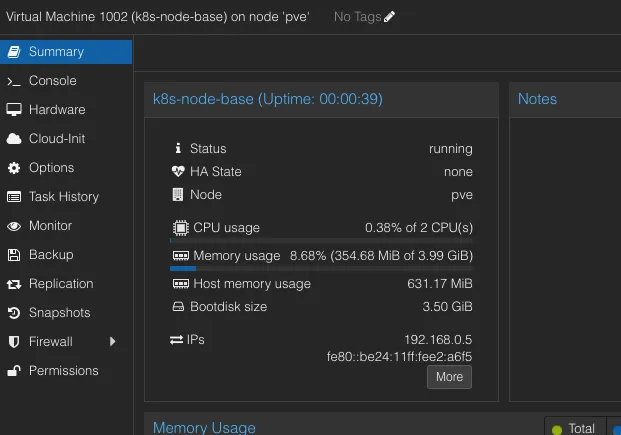
Let’s set up container environment next. We’ll be setting up containerd.
# Add keys for the docker repo
curl -fsSL https://download.docker.com/linux/ubuntu/gpg | sudo apt-key add -

# Enable docker repo
sudo add-apt-repository "deb [arch=amd64] https://download.docker.com/linux/ubuntu $(lsb_release -cs) stable"

# Install containerd package
sudo apt-get update && sudo apt-get install -y containerd.io
For my installation, what I’ve noticed is that containerd by default doesn’t enable Systemd Cgruop which will cause a lot of issues with pods. So we’ll update the configuration for that as well.
# Fallback to default config
containerd config default | sudo tee /etc/containerd/config.toml

# Enabling Systemd Cgroup
sudo sed -i 's/SystemdCgroup = false/SystemdCgroup = true/' /etc/containerd/config.toml

# Restart containerd
sudo systemctl restart containerd

# With Ubuntu 24.04, I've noticed that the containerd group is root by default. We'll override this by creating a new group and giving ubuntu permission.
sudo groupadd containerd
sudo usermod -aG containerd ubuntu
sudo chgrp containerd /var/run/containerd/containerd.sock
sudo chmod 660 /var/run/containerd/containerd.sock

# Refresh the shell
newgrp containerd
Doing this won’t enable unprivilaged access to containerd. Since /var/run is a tmpfs, it’ll be recreated at boot, essentially resetting our changes. So, to fix this we’ll create a SystemD service override that will trigger a post start command to change the group to containerd.
# Create override directory
sudo mkdir -p /etc/systemd/system/containerd.service.d

# Now add below lines to override.conf file in the directory created above.
[Service]
ExecStartPost=/bin/chown root:containerd /var/run/containerd/containerd.sock
ExecStartPost=/bin/chmod 660 /var/run/containerd/containerd.sock

# Rexec and reload daemon
sudo systemctl daemon-reexec
sudo systemctl daemon-reload

# Restart containerd
sudo systemctl restart containerd
Next, we’ll install Kubernetes packages: kubeadm, kubelet and kubectl.
# Download the keyring for Kubernetes repo
curl -fsSL https://pkgs.k8s.io/core:/stable:/v1.34/deb/Release.key | sudo gpg --dearmor -o /etc/apt/keyrings/kubernetes-apt-keyring.gpg

# Enable Kubernetes repo
echo 'deb [signed-by=/etc/apt/keyrings/kubernetes-apt-keyring.gpg] https://pkgs.k8s.io/core:/stable:/v1.34/deb/ /' | sudo tee /etc/apt/sources.list.d/kubernetes.list

# Install and enable the packages
sudo apt-get update
sudo apt-get install -y kubelet kubeadm kubectl
sudo apt-mark hold kubelet kubeadm kubectl
sudo systemctl enable --now kubelet
On Ubuntu 24.04, we need to enable IP forwarding as well as br_netfilter kernel module for Kubernetes to work fine.
# enable IP forwarding permanently
echo 'net.ipv4.ip_forward=1' | sudo tee -a /etc/sysctl.conf && sudo sysctl -p

# enable br_netfilter kernel module
echo "br_netfilter" | sudo tee /etc/modules-load.d/br_netfilter.conf
Additionally, we can also pre-pull the control plan container images to avoid the download during node bootstrap.
kubeadm config images pullConverting the VM to Template
We are finally done with the prep of our base image and let’s create a template now. Stop the VM and execute this command.
qm template 1002Proxmox will now mark your VM as a template, i.e., you can not start the VM, you can only clone new VMs based on the template.
Outro
Proxmox lets us create templates with the required tools preinstalled, essentially eliminating the need to repeatedly install packages for our Kubernetes nodes.
Up Next: We’ll launch three VMs as clones of our template and set up the Kubernetes cluster.